CCM Scan History
Overview
The Scan History tab provides a complete history of all scans executed for the selected website. It allows users to review previous scan executions, monitor scan status, track scan activity, and access detailed scan results and version comparisons.
- Login to the Data Governance Tool by entering your credentials.
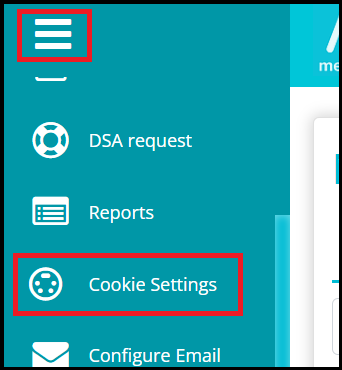
Click on the hamburger menu (three horizontal lines).
Navigate to Cookie Settings from the left-hand menu.
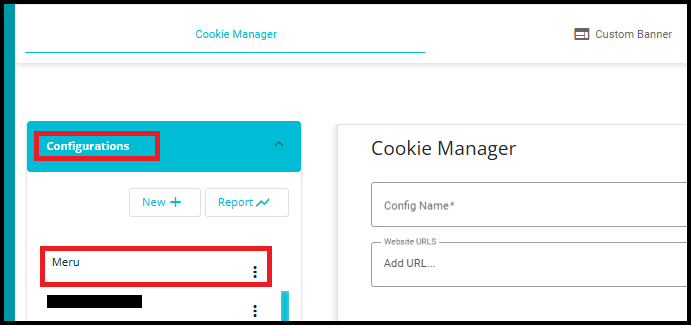
- In the Configurations section, click on any existing configuration.
- After selecting a configuration, click the Go To Scan button.

- Alternatively, click the three-dot (More Actions) menu next to the configuration name and select Scan and Autoblock.
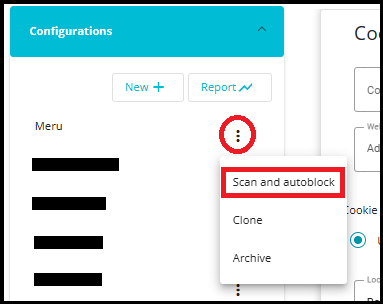
Whether you click Go To Scan or select Scan and Autoblock from the More Actions (three-dot) menu, the system navigates you directly to the Cookie Scanning and Auto Blocking page associated with the selected configuration.
On the Cookie Scanning and Auto Blocking page, click the Scan History tab.
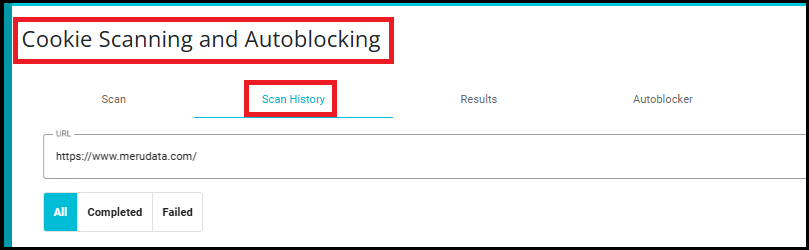
URL
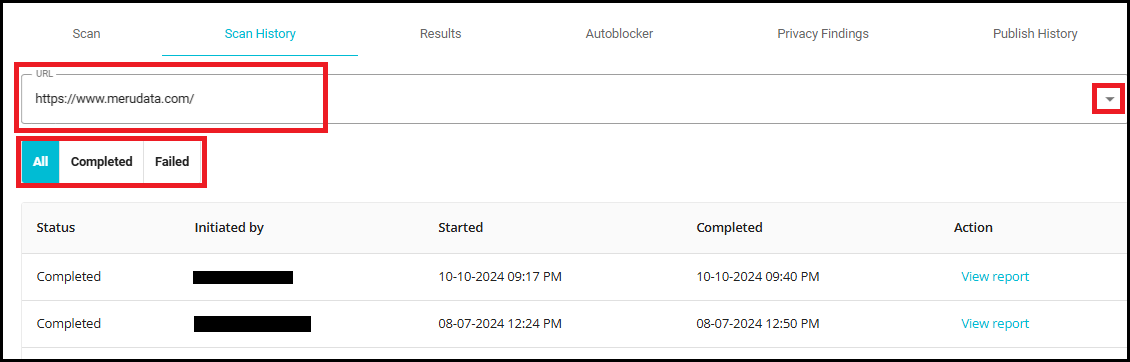
The URL dropdown displays all website URLs associated with the selected configuration.
Select a URL from the dropdown to view the scan history for that specific website.
If multiple websites are configured under the same CCM configuration, this filter allows you to switch between them and review their individual scan histories.
Once a URL is selected, the grid displays only the scans related to that website.
Status Filters
- The status filter buttons allow you to filter scan records based on their execution status.
- All
Displays all scan records for the selected website regardless of status.
This option provides a complete view of the scan history, including both successful and unsuccessful scan executions.
- Completed
Displays only scans that were completed successfully.
Use this filter when you want to review completed scan results or access reports generated from successful scans.
- Failed
Displays only scans that were not completed successfully.
Use this filter to identify scan failures and troubleshoot issues related to scan execution.
Scan History Table
The Scan History table provides detailed information about each scan execution for the selected website.
Status: Displays the current status of the scan.
Initiated By: Displays the user who initiated the scan or System for automated scans.
Started: Displays the date and time when the scan began.
Completed: Displays the date and time when the scan finished.
By comparing the Started and Completed timestamps, users can determine how long the scan took to execute.
- Action: Provides access to the scan results.

- Click View Report to open the report generated by the selected scan.

Scan Insights
On clicking View Report from the Action column in the Scan History tab. This opens the Scan Insights page, where you can review scan results for different websites and versions.

Website: The Website dropdown allows you to select the website whose scan insights you want to view.
Version: The Version dropdown allows you to view different versions of scan results generated for the selected website.
- Original Scan Results - When viewing an original scan result, the version is displayed along with the scan result identifier.
Example: Version_1 (Scan_Result)
This indicates that the displayed results belong to the original scan output for that version.
- Reclassified Versions - If a version has been reclassified after the scan was completed, the version information is displayed differently.
Example:
Version_2
Reclassified (Upload) -- 07-26-2024
In this case, the version represents a reclassified result rather than the original scan output. Therefore, the scan result identifier is not displayed with the version name. Instead, information about the reclassification is shown.

Compare Versions
The Compare Versions feature allows you to compare any two scan versions and identify changes between them.
On the Scan Insights page, click Compare Versions.
The system checks whether a comparison report already exists for the selected versions.
When you click Compare Versions, the system automatically compares the latest version with the previous (legacy) version by default. This allows users to immediately review the most recent changes without manually selecting versions. If required, users can change the selected versions using the Baseline and Compare To dropdowns to compare any other version combination.

If a Comparison Report Already Exists
- If a comparison report has already been generated, the report is displayed immediately when you click Compare Versions. The existing comparison results are loaded, allowing you to review version differences without generating the report again.
If a Comparison Report Does Not Exist
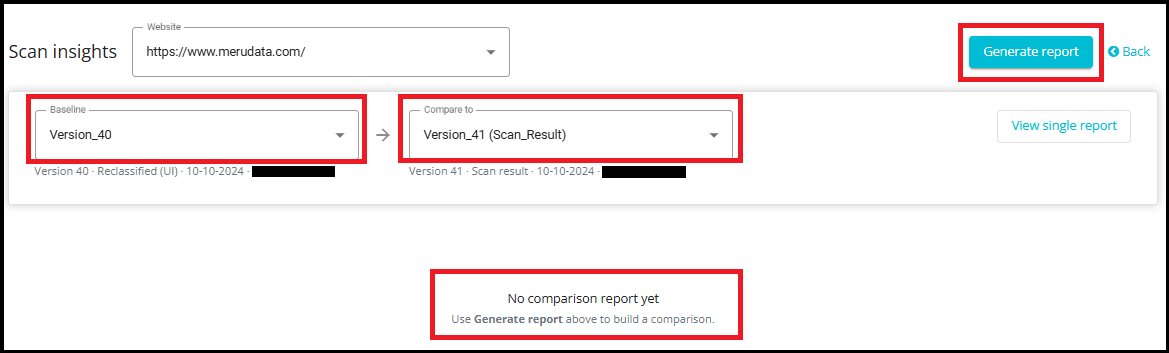
If no comparison report has been generated for the selected versions, the comparison screen displays:
Baseline dropdown -- Select the older version that you want to compare from.
Compare To dropdown -- Select the newer version that you want to compare against.
A "No comparison report yet" message indicating that a comparison report has not been generated.
To create the comparison report:
Select the required versions from the Baseline and Compare To dropdowns.
Click Generate Report in the upper-right corner of the screen.
- Once the report generation process starts, a snack bar notification is displayed at the bottom of the screen: "Report is being generated. You'll receive a notification when it's ready."

Viewing Comparison Report Notifications
- Click the bell (Notifications) icon in the top-right corner of the screen.

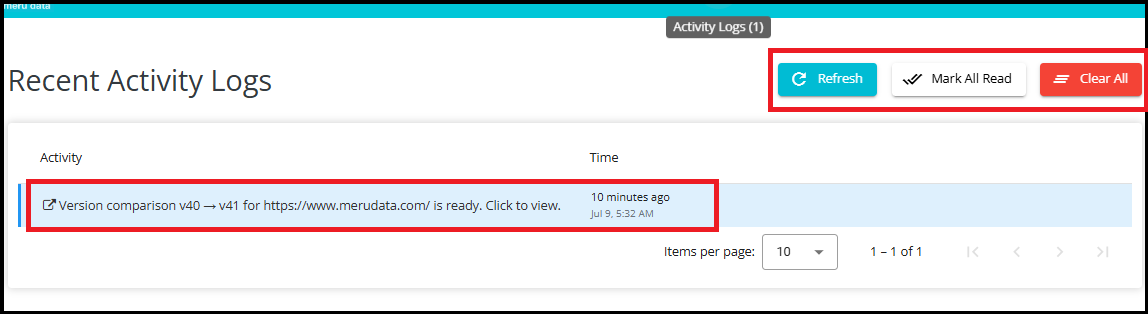
The system opens the Recent Activity Logs page.
Locate the version comparison activity entry.
Click the activity entry to open the generated comparison report directly.
The Time column displays when the report was generated, helping users track recent report generation activities.
The Recent Activity Logs page provides the following options:
Refresh -- Reloads the activity log list and retrieves the latest notifications.
Mark All Read -- Marks all activity log entries as read.
Clear All -- Removes all activity log entries from the notification list.
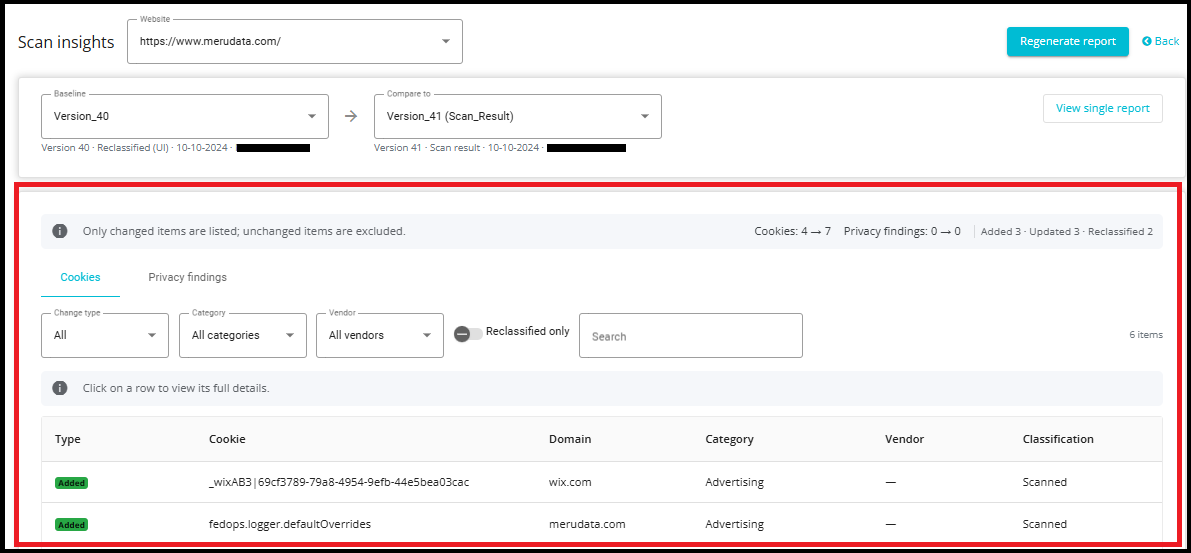
The comparison report displays only the items that have changed between the compared versions. Any cookies that remain unchanged are excluded from the report, making it easier to focus on the differences.
At the top of the comparison report, you can see a summary of the changes identified between the selected versions, including:
Cookies: Old Count → New Count -- Displays the total number of cookies in the baseline version compared to the latest version.
Privacy Findings: Old Count → New Count -- Displays the privacy findings count in both versions.
Added -- Number of newly discovered cookies.
Updated -- Number of cookies whose details changed between versions.
Reclassified -- Number of cookies whose category classification was modified.
Deleted -- Number of cookies that existed in the baseline version but are no longer present in the latest version.
- When viewing a version comparison report, only the Cookies and Privacy Findings tabs are available.
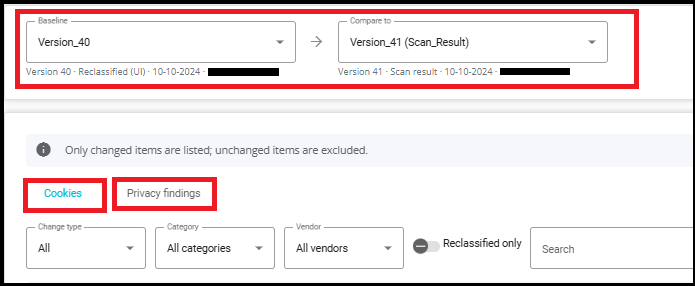
Cookies Tab
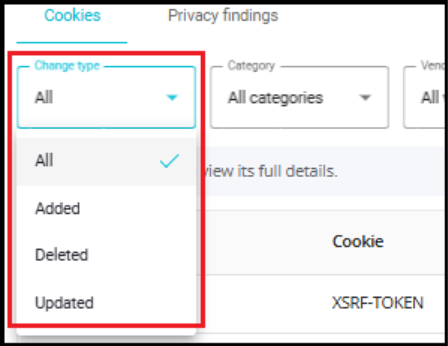
Change Type - The Change Type dropdown allows users to filter the comparison results based on the type of change detected between the baseline version and the compare to version.
Available options include:
All -- Displays all changes identified between the compared versions.
Added -- Displays only cookies that were newly added in the latest version and were not present in the previous version.
Deleted -- Displays only cookies that existed in the previous version but are no longer present in the latest version.
Updated -- Displays only cookies whose details were modified between the compared versions.
- Reclassified Only - The Reclassified Only toggle allows users to view only cookies that have been manually reclassified between the compared versions.
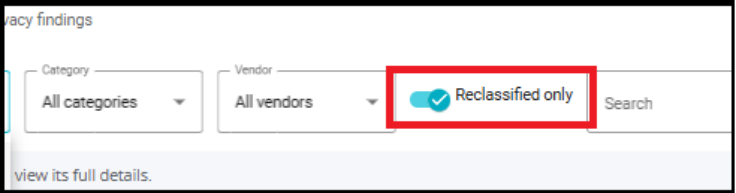
Category -- Use the Category dropdown to filter cookies by their classification, such as Functional, Advertising, Analytics, or other available categories. For example, if you want to view only functional cookies, select Functional from the dropdown.
Vendor -- Use the Vendor dropdown to filter cookies associated with a specific vendor. This helps users focus on cookies provided by a particular third-party or service provider.
Search -- The search box allows you to search for cookies using either the cookie name or the domain. This is useful when looking for a specific cookie or identifying all cookies associated with a particular domain.
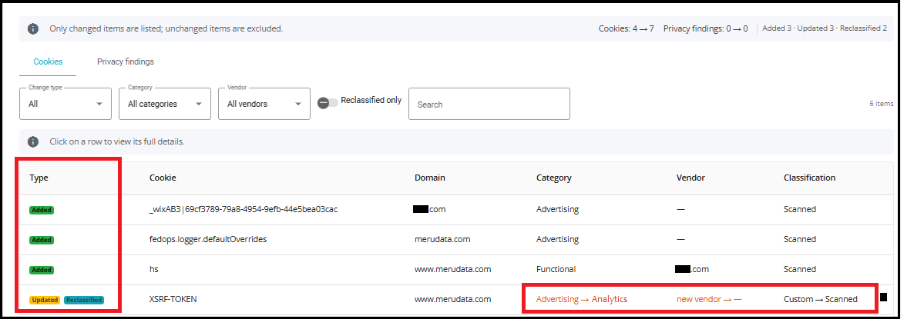
Cookie Details Grid -- The grid displays the scan results, including:
Type Column - The Type column indicates the kind of change detected for a cookie between the compared versions.
Name -- The name of the cookie.
Domain -- The domain on which the cookie is present.
Category -- The category assigned to the cookie.
Vendor -- The vendor associated with the cookie.
Classification - The Classification column indicates how the cookie's category was assigned.
Possible values for classification include:
Scanned -- The cookie category was assigned automatically by the scanning engine.
Custom -- The cookie category was manually modified by a user.
During version comparison, the column displays the previous and current classification source in the following format: Previous Value → Current Value
Scanned → Custom - The cookie was originally classified by the scan engine and was later manually modified by a user.
Custom → Scanned - The cookie was previously manually classified, but the latest version reflects the classification assigned by the scan.
Example
Suppose the report compares Version 41 (Scan) against Version 40 (Reclassified):
A newly discovered cookie will appear with the change type Added.
A cookie that no longer exists in the latest scan will appear as Deleted.
If a cookie's vendor, category, domain, or other details have changed, it will appear as Updated.
If a cookie was manually moved from one category to another (for example, Advertising → Analytics), it will appear as Reclassified.
Updated + Reclassified: This means the cookie was modified and its classification was also changed when compared to the previous version.
Viewing Full Cookie Details
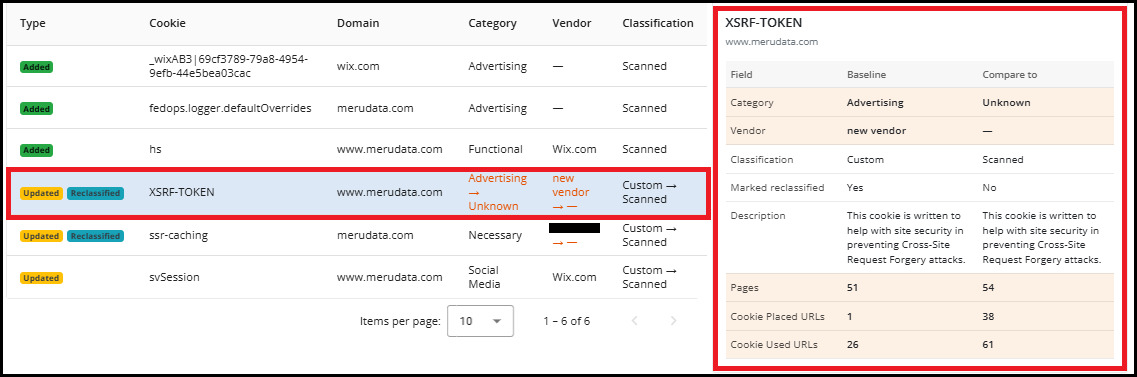
To view detailed information about a cookie, click on any row in the Cookies grid. When a cookie is selected, a detailed information panel is displayed on the right side of the screen.
In a comparison report, the details panel displays information from both the Baseline version and the Compare To version, allowing you to easily identify what changed between the two versions.
Rows highlighted in the details panel indicate fields that were updated between the compared versions.
Privacy Findings Tab
The Privacy Findings tab displays all privacy-related findings identified during the selected CCM scan. These findings help users identify potential privacy compliance issues, monitor scan results, and review findings across different websites and configurations.
Note: Version comparison is currently not available for Privacy Findings. Unlike the Cookies tab, Privacy Findings cannot be compared across different scan versions.
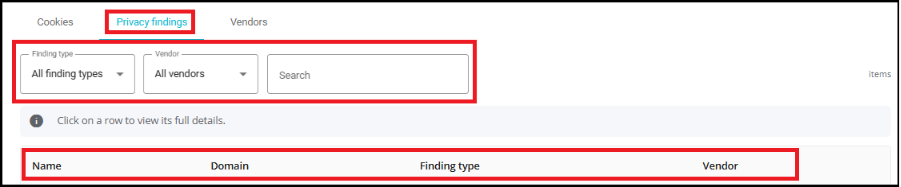
The tab provides filtering and search options to help users quickly locate specific findings:
Finding Type -- Use the Finding Type dropdown to filter findings by their classification. For example, you can view only a specific type of privacy finding instead of displaying all findings.
Vendor -- Use the Vendor dropdown to filter findings associated with a particular vendor or third-party service.
Search -- The search box allows you to search for findings using the finding name or domain, making it easier to locate a specific privacy finding.
Privacy Findings Grid -- The grid displays the privacy findings identified during the scan, including:
Name -- The name of the privacy finding.
Domain -- The domain where the finding was detected.
Finding Type -- The category or type of privacy finding.
Vendor -- The vendor associated with the finding.
Click Regenerate Report if you want the system to rebuild the comparison report for the selected version pair.
Click View Single Report to exit the version comparison view and return to the standard Scan Insights report. This option displays the scan results for the selected version only and hides the version comparison information.
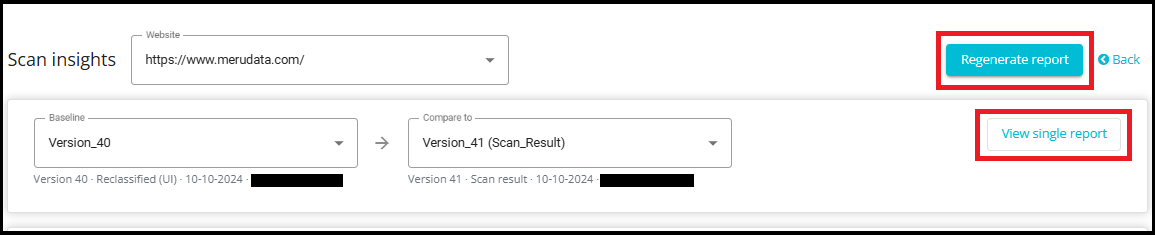
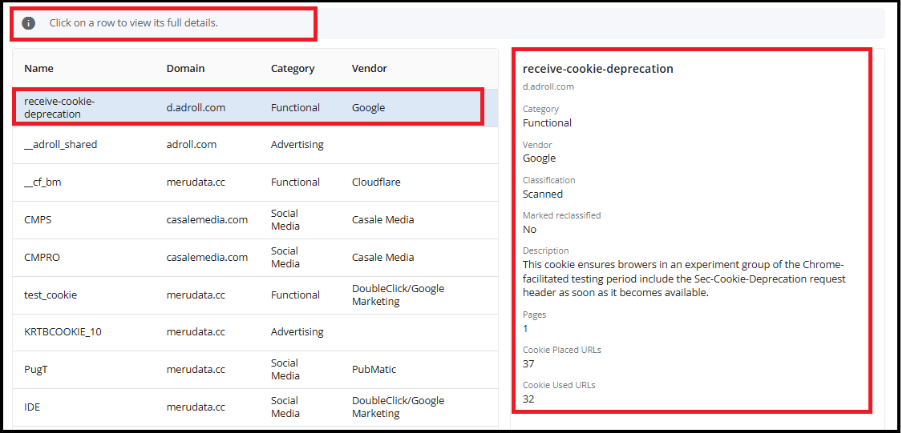
When viewing a single scan version, the Cookies grid displays only the following columns: Name, Domain, Category, and Vendor.
Selecting a cookie displays its detailed information panel on the right side of the screen, including information such as category, vendor, classification, description, pages, cookie placed URLs, and cookie used URLs.
Vendors Tab
Note: The Vendors tab is available only on Single Report View.
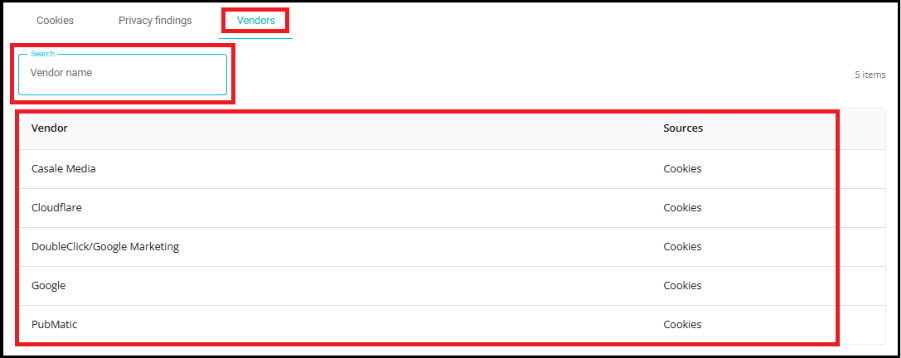
The Vendors tab provides a consolidated view of all vendors identified during the selected CCM scan, including vendors detected through Cookies and Privacy Findings. This tab helps users understand which third-party vendors are present across the scanned website and the source through which they were detected.
The tab includes the following features:
Vendor Search -- Use the search box to quickly find a vendor by entering its name. This is useful when reviewing websites with a large number of detected vendors.
Vendor Grid -- Displays a list of all vendors identified during the scan, along with the source from which each vendor was detected.